How to add custom image size in WordPress
When it comes to optimizing your WordPress site for search engines, it’s not just your content that matters. The images you use play a crucial part too. Properly optimized images can significantly improve your site’s SEO, boost engagement, and reduce page load times. One of the ways to optimize your images is by using the right sizes. WordPress makes it easy to add custom image sizes to suit your specific needs. This article will guide you through the process.
Why Custom Image Sizes Matter
Before we delve into the ‘how’, let’s talk about the ‘why’. Why should you care about custom image sizes?
- Improved Site Performance: Images are often the largest files on a web page. Large, unoptimized images can make your site slow, and a slow site will negatively impact your SEO. By using custom image sizes, you can ensure that your images are only as large as they need to be, improving page load times.
- Better User Experience: Custom image sizes also allow for better design and layout. You can ensure that your images fit perfectly within the content, making the site more visually appealing and user-friendly.
- Increased Engagement: Well-optimized, properly sized images can drive better engagement. They can make your content more shareable and can improve dwell time, both of which can positively impact your SEO.
Custom Image Sizes Code Snippet
WordPress provides a simple way to add custom image sizes through the add_image_size function. This function allows you to define the width and height of the image, and whether the image should be cropped to fit those dimensions exactly or resized proportionally.
Let’s look at an example. You can add the following code to your theme’s functions.php file:
add_action( 'after_setup_theme', 'add_custom_image_sizes', 100 );

/**
 * Add Custom Image Size.
 *
 * @return void
 */
function add_custom_image_sizes() {
    add_image_size( 'blog-post-thumbnail', 300, 200, false );
    add_image_size( 'product-review', 600, 600, false );
    add_image_size( 'sidebar-widget', 150, 150, true );
}
The function add_image_size takes four parameters which are:
- Size name: make sure this field is unique in order to avoid overwriting any other image size.
- Size width
- Size height
- Crop: Enable cropping the original image or not, takes true or false.
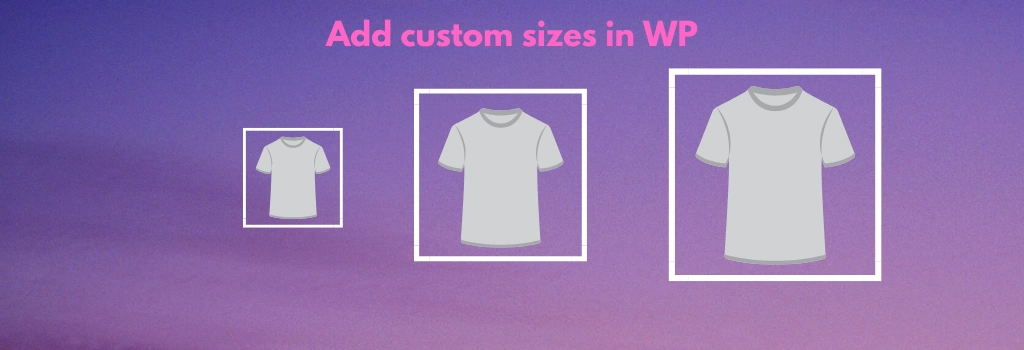
In this example, we’re adding three custom image sizes:
blog-post-thumbnail: This is a 300x200px image size. The ‘false’ parameter means the image will be resized to fit the dimensions while maintaining the aspect ratio.product-review: This is a square 600x600px image size, ideal for product images. Again, the ‘false’ parameter indicates the image should be resized proportionally.sidebar-widget: This is a 150x150px image size. The ‘true’ parameter means the image will be hard cropped to these exact dimensions.
How to Use the Code snippet
You can implement this snippet by following on of these steps:
- Child Theme: If you’re using a custom child theme, you can add the snippet to the
functions.phpfile of your child theme. This ensures that the functionality remains intact even when you update your theme. - Custom Plugin: A better way, you can create a custom plugin to add the snippet. Creating a custom plugin allows you to keep your code separate from the theme files, making it easier to manage and maintain. You can use our online tool WP Plugin Creator to generate a custom plugin with the snippet included. Simply paste the snippet into the plugin code editor, specify the plugin name, and download the generated plugin zip file.
A Simpler Way with Image Sizes Controller Plugin
While the above method provides a way to add custom image sizes, it involves dealing with code. If you prefer a more user-friendly way, consider using our plugin Image Sizes Controller plugin ↗.
The plugin provides an intuitive interface to create unlimited custom image sizes without touching a line of code. It also allows you to disable any image size from being created for new uploads, control image sizes based on specific conditions, and fix broken sizes or create missing sizes with a single click. This comprehensive solution can help you manage your image sizes more efficiently and enhance your website’s performance and SEO.
Conclusion
In a nutshell, adding custom image sizes in WordPress is a simple yet powerful way to optimize your site’s images, improving your website’s performance, user experience, and SEO. Remember, every image on your site is an opportunity to improve your SEO and engagement, so take full advantage of the add_image_size function. Happy optimizing!
Looking for WooCommerce plugins?
GrandPlugins — Lightweight WordPress & WooCommerce Plugins
Cart control, pricing rules, media watermarking & more. Affordable and actively supported.