
How to protect Your Images in WordPress and WooCommerce
In the realm of eCommerce and digital content, images are not just accessories but powerful tools of communication. They attract attention, simplify complex concepts, and can decisively influence consumer decisions. But as the digital world expands, so does the risk of unauthorized image usage. Therefore, protecting your images becomes an essential aspect of online operations.
Watermarking is one of the most effective ways to secure your images. It deters misuse, helps in asserting ownership, and even aids in branding. This guide will help you understand the importance of watermarking, its benefits, and how it can play a crucial role in your digital strategy.
Understanding Watermarks and Their Importance
A watermark is a text or logo superimposed onto your image, meant to prevent unauthorized use while asserting your ownership. They can be transparent or opaque, depending on your preference. They’re essential for various reasons:
- Deterrence Against Theft: Watermarks make it difficult for others to use your images without permission since removing them can affect the image’s quality.
- Asserting Ownership: Watermarks are a clear indication of who owns the image, making it easier to assert your rights if someone uses your image without your consent.
- Brand Visibility: Watermarks, especially those with a logo or brand name, can enhance brand visibility.
How to watermark your images in WordPress and WooCommerce
In order to protect your images in WordPress and WooCommerce, you can use the WP Watermark Images Plugin. The plugin is an all-in-one solution for creating, managing, and applying watermarks to your images. It’s user-friendly, making it perfect even for those without technical backgrounds. With this plugin, not only can you safeguard your images, but you can also strengthen your brand’s presence.
Now that we understand what the plugin does let’s dive into how to use it.

Step-by-Step Guide to Using the WP Watermark Images Plugin
Step 1: Install the Plugin
Start by getting the WP Watermark Images Plugin. Download the plugin file and navigate to your WordPress dashboard. Go to Plugins > Add New > Upload Plugin. Choose the downloaded file and click ‘Install Now’. After installation, activate the plugin.

Step 2: Accessing the Plugin’s Settings
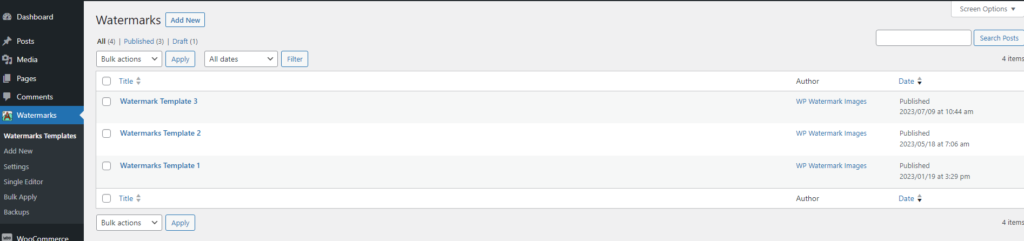
Once activated, the plugin’s settings will be available in your WordPress dashboard. Navigate to Watermarks page There, you can create watermarks templates, apply watermarks templates in bulk, on uploaded images automatically or watermark single image.
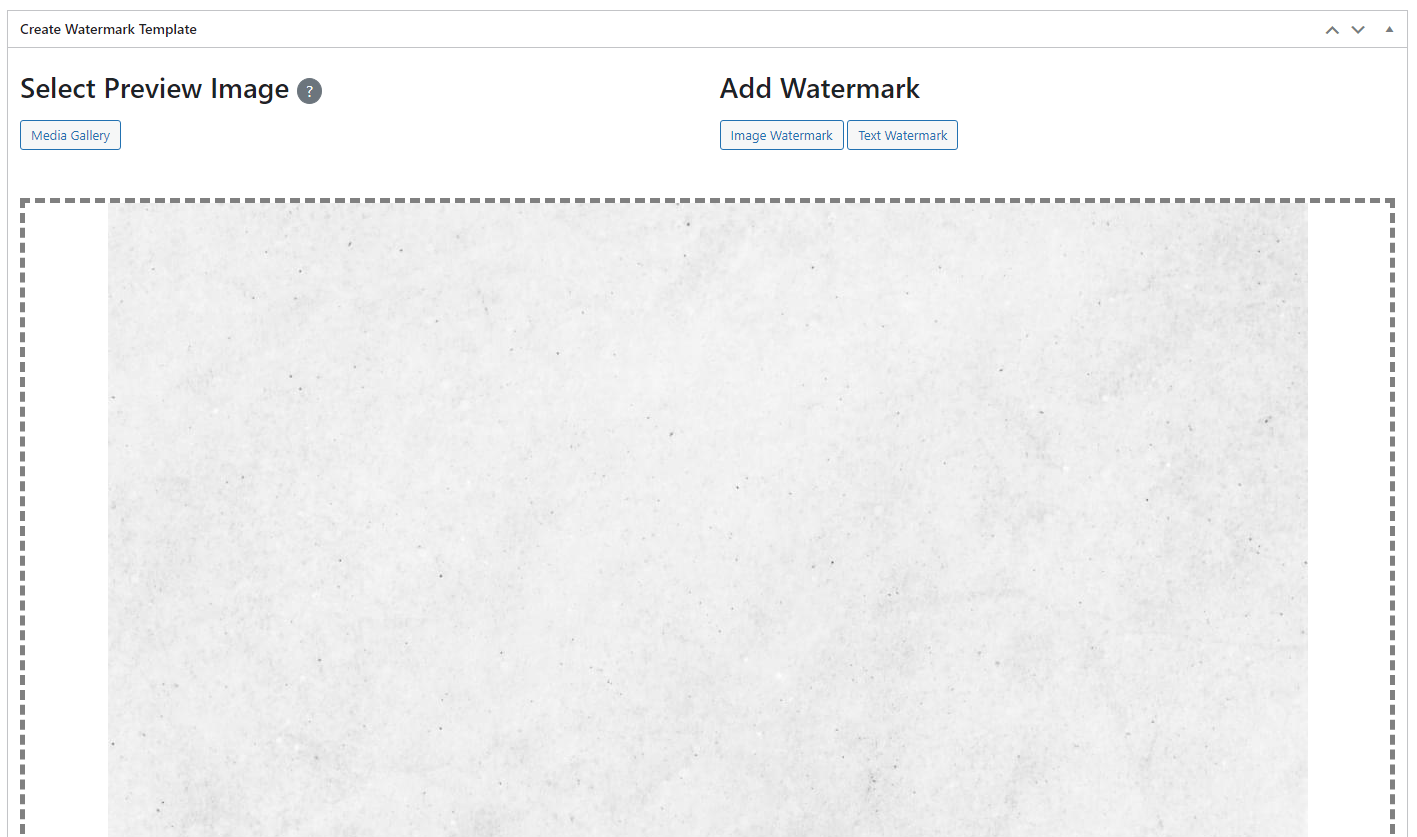
Step 3: Creating Your Watermarks Template
The watermarks template creation process is straightforward with this plugin. You can opt for a text watermark or a logo-based or both.
To create a watermarks template, Click Add New
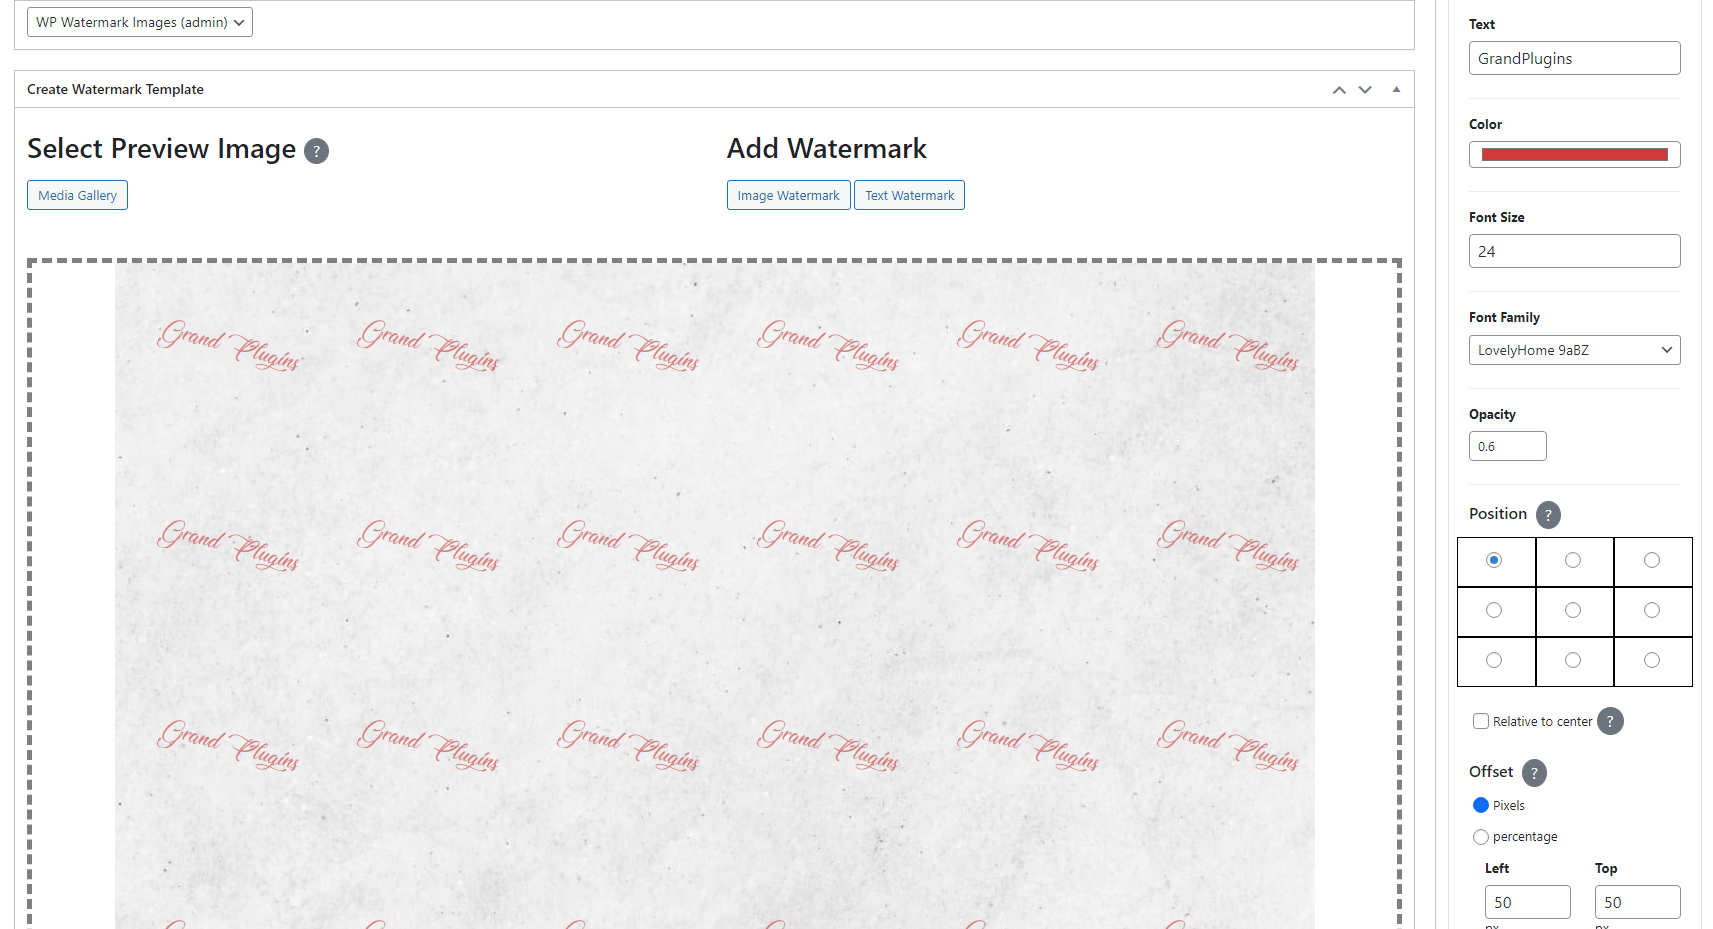
To create a text watermark, Click on the Text Watermark button, A new Text watermark tab will be created in sidebar. There, you can type in the desired text, choose the font, size, color, angle, and opacity. You can also decide the position of your watermark on your image.
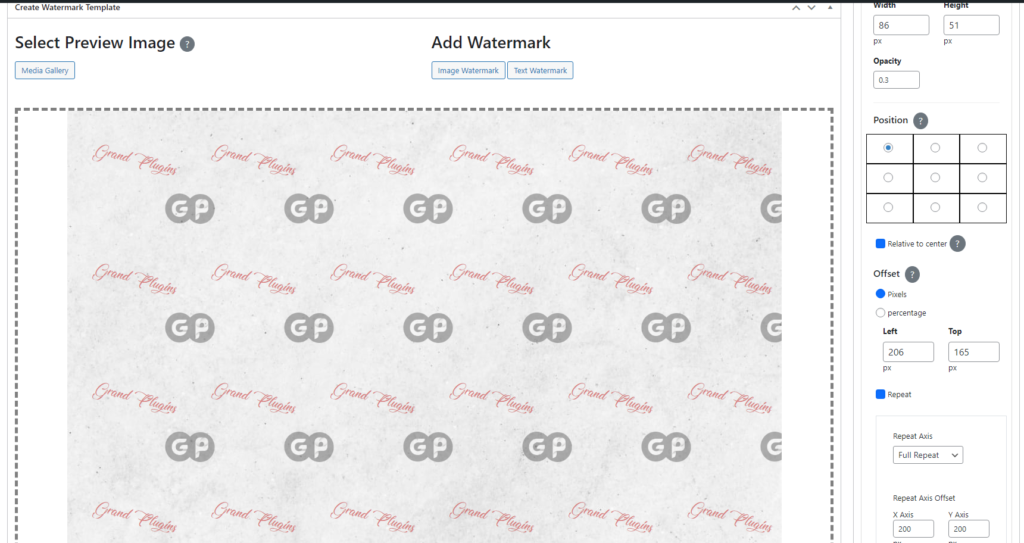
For a logo watermark, click on the Image Watermark button. select your logo, and similar to the text watermark, adjust the size, opacity, and position.
You can add as many watermarks as you want either text watermarks or image watermarks.
Step 4: Configure and Position Your Watermarks
The ‘Watermark Settings’ tab allows you to control when and where your watermark is applied. You can choose to apply the watermark on all images or only on specific image sizes. You can select which side on the image you want the watermark to be placed, you can also control each watermark repeat whether you want to repeat it in vertical, horizontal, diagonal or a full repeat.
Step 5: Preview and Adjust
The plugin allows you to preview the watermark before applying it. This feature is essential to ensure your watermark looks exactly as you intended. If you’re not satisfied with the look, you can go back and adjust the watermark design and position until you’re happy with the result.
All you need to do is hitting the Preview Watermarks button, and the preview image will be watermarked and displayed under the button.
Step 6: Applying Your Watermark
Now that your watermark is ready and the settings are configured, it’s time to save it. Click on Publish / Update to save your changes. You can then apply the template on images in bulk from Bulk Apply page or apply it automatically on new uploaded images.
Step 7: Configure Auto watermarking
Last step is setting the auto watermarking configurations of the template in Auto Watermarking settings section.
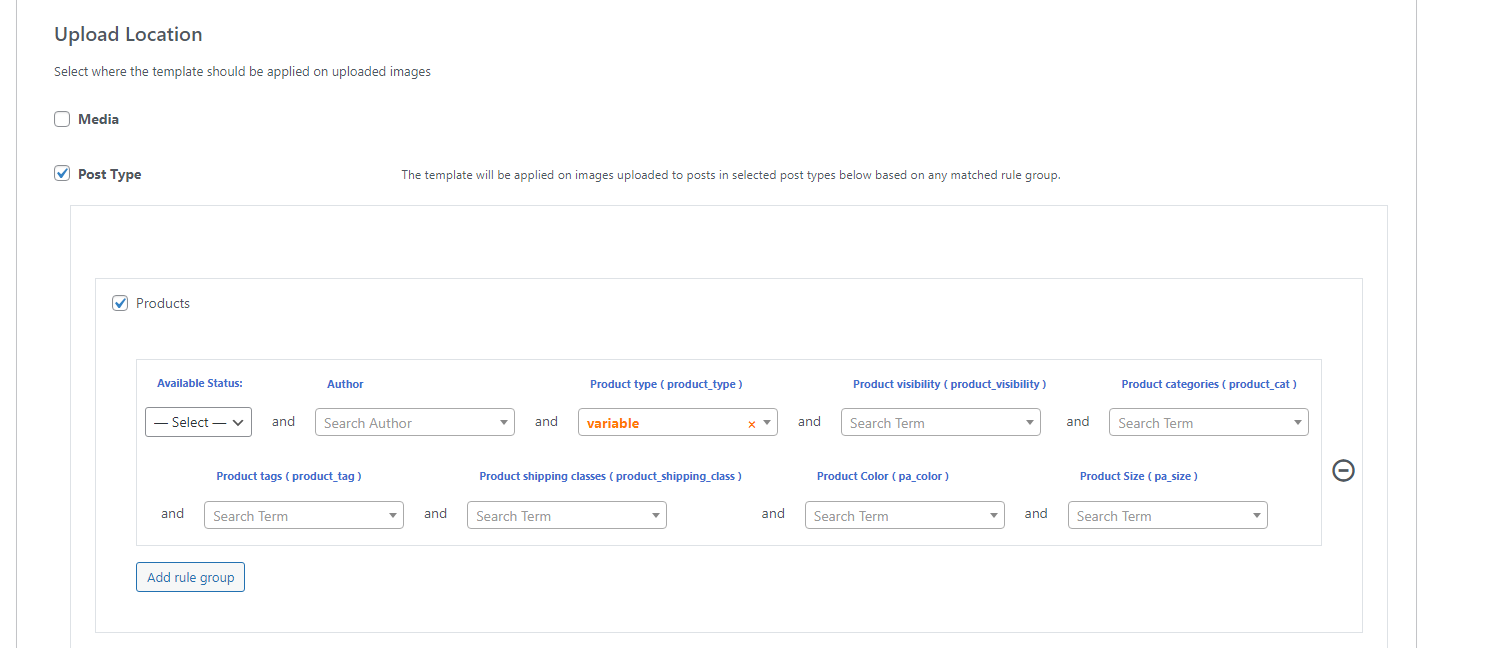
First, enable the auto apply feature by checking the Enable auto apply checkbox, then select the images upload location where you want to apply this watermarks template.
You can select the upload location to be regular media or make a complex selection by selecting specific post type. For example, you may want to apply specific watermarks template on images uploaded to WooCommerce variable products only.
Step 8: Apply Watermarks Type
The last step is to select how to apply the watermarks on the image whether to watermark the image itself or create a separated watermarked image, You can then select which sizes to watermark.

The Benefits of Using the Watermark Images Plugin
The Watermark Images Plugin offers several advantages:
- Ease of Use: The plugin provides a user-friendly interface that makes watermarking images a breeze even for non-tech savvy individuals.
- Versatility: It allows both text and image watermarks, giving you the flexibility to choose what fits your brand the best.
- Control: The plugin gives you control over the size, position, and opacity of the watermark, along with the option to choose on which images the watermark should appear.
- Automatic Watermarking: The plugin also supports automatic watermarking. This means that any new image you upload to your WordPress site will be automatically watermarked, saving you the effort of manually applying the watermark each time. To enable this feature, go to the plugin settings and toggle on ‘Auto Watermarking’.
- Automatic Watermark Scaling: Another advanced feature of the plugin is the automatic watermark scaling. This feature automatically adjusts the size of your watermark based on the size of the image it’s being applied to. This ensures that your watermark is always visible and proportionate, no matter the size of your image.
- Bulk Watermarking: The bulk watermarking feature allows you to add watermarks to a large number of images at once. This can be a huge time-saver if you have an extensive image library. To use this feature, navigate to the plugin settings and click on ‘Bulk Watermark’. Here, you can select the images you want to watermark and apply your chosen watermark with a single click.
Conclusion
The WP Watermark Images Plugin for WordPress and WooCommerce is a comprehensive tool that provides robust watermarking features while being incredibly user-friendly. With this plugin, you can protect your images, enhance your branding, and deter unauthorized use of your visuals.
Remember, each image on your website represents an investment of time, effort, and resources. Protecting these assets is essential for maintaining your brand’s integrity and value. As such, the Watermark Images Plugin is more than just a handy tool; it’s a vital component of your online business strategy.
Regardless of whether you’re a blogger, a small business owner, or running a large eCommerce store, we highly recommend using this plugin to safeguard your images. After all, it’s better to be safe than sorry!
Looking for WooCommerce plugins?
GrandPlugins — Lightweight WordPress & WooCommerce Plugins
Cart control, pricing rules, media watermarking & more. Affordable and actively supported.